Host: How to Prepare for your session and use Zoom
Preparing your Session so it is more Accessible
Use Clear/Plain Language
Clear writing is a way of presenting information so that it is easy for everyone to read and understand. Clear language or plain language as it is called in some places, considers how the material looks, as well as what it says. Clear language prevents misunderstanding between you and your reader by avoiding jargon and technical words.
- Writing so audience will understand
- Avoid using acronyms
- Focus on most important information
- Use active words or voice
- Use of white space and pictures
- Make it quick to read – avoid too much text on a slide!
- Make it attractive
- Make it clear!
Additional Accessibility Considerations
- Make sure slide content can be read in the order that you intended
- Give every slide a unique title
- Choose colours carefully, as certain combinations are harder to read. A great resource on this can be found here.
- Include Alternative text with all visuals. You can google how to add alt-text with whatever software you are using.
- Use a simple table structure and specify column header information. Note this may be hard to read for people using screen readers. More information on this for: powerpoint & google slides.
- Use a larger font size of 22pt or larger, and choose a font that is easier to read like Arial or Helvetica.
- Utilize the captioning and audio description features on videos.
Making the Most of Zoom
Zoom is an online video calling, conferencing, and webinar software. This guide explores key features of Zoom you may want to use to support a participatory session for the Unconference, as well as important accessibility considerations. For more support on how to use Zoom, visit here.
Think about Accessibility
- Provide auditory descriptions of images that are displayed
- Provide a clear outline or agenda of the meeting and have a process for people to take breaks
- Use a “shared harvest” that allows for simultaneous note taking in a Google Doc, Microsoft Word Online, or similar software This allows people to view what they missed if they need to leave, helps you by having others take notes with you and can clarify what is said (including spelling) as well as allows another way to process the information. A template will be provided to you by the Unconference planning team.
Best Practices (for access and general flow)
- Build a Hosting Team with a minimum of 3 people, with one person being lead facilitator, one being the harvester, and one being the tech support person (see What is a Host 2021).
- Join the Zoom 15 minutes early to ensure hosting access is granted, and the Hosting Team is all set up and ready to go for the session.
- Play the ABCD Unconference slidedeck for the first few minutes as people arrive and get settled, which can be found here: https://docs.google.com/presentation/d/1lJXKbT6Tck3F63nDKcn0DLdJ7xpo3gAiOB30Zode2yE/edit?usp=sharing
- Identify the tech support person at the beginning of the session.
- Create opportunities early on for participants to get involved – e.g. introducing themselves in the chat, or quick breakout rooms where people can check-in in pairs.
Learn more about Zoom accessibility: https://zoom.us/accessibility
Zoom Host Key Features
The Zoom ‘Host’ in a session has additional powers and abilities that support participation in the session.
A Zoom Admin will join the room first and then give you Host access.
The Zoom ‘Host’ will have a slightly different menu than participants:

- Dark Red Arrow: ‘Join Audio’. This is your audio control button.
Remember to mute yourself when you aren’t speaking to reduce background noise. You can access and adjust your audio settings, including your microphone and speakers, by clicking on the ^ to the right of this button. - Red Arrow: ‘Start Video’. This is your camera control button.
To adjust your camera, video settings, or add a virtual background, click on the ^ to the right of this button. - Orange Arrow: ‘Security’. This allows you to manage the security of the call.
Click on this button to toggle on/off features like ‘enable waiting room’, and what you allow participants to do, like ‘chat’, ‘rename themselves’, and whether they can ‘unmute themselves’ or ‘start video’. Be sure you have your preferred security settings put in place before starting.
- Yellow Arrow: ‘Participants’. This is your button to manage participants.
When you click on this button, a new ‘Participants’ menu will pop up where you can see who is in the call, who is in the waiting room (and let them in), etc. You can ‘rename’ people here. You can see whose microphone is on, and turn it off, or can click the ‘mute all’ button if needed to reduce background noise. Additional settings for participants can be found when you click ‘more’. If needed, you can remove people from the meeting through this menu. - Green Arrow: ‘Chat’. To access the chat feature, click this button.
You can message ‘Everyone’ in the call, or send messages to specific individuals. Be sure who you have selected in the ‘To’ area before sending a message. You can adjust who participants can chat with by clicking on the ‘…’ in the participants menu. You can share links to collaborative tools for the session here (e.g. a google doc or google slides, jamboard, miro board, mural) - Light Blue Arrow: ‘Share Screen’. This button allows you to share content.
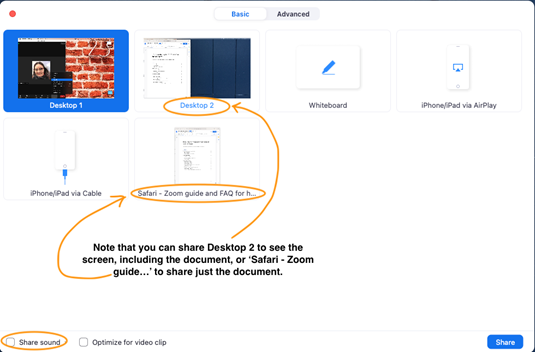
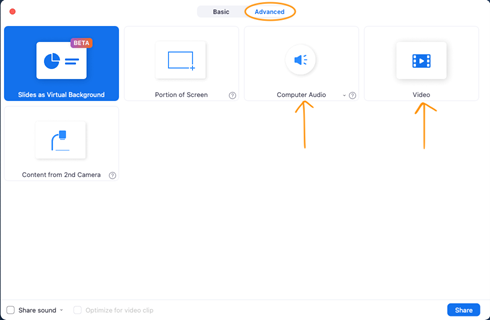
Clicking on the ‘Share Screen’ button will cause another menu to pop up. You will be asked to choose what you would like to share, or to activate the whiteboard – note that some options share your entire screen, while some share a single app, or web browser tab. IMPORTANT NOTE: if you have a video or need to share audio, be sure to check ‘share sound’ in the bottom left. You can share just computer audio or a video file by choosing ‘advanced’ at the top of the menu and selecting either of those options. - Blue Arrow: ‘Record’. The button to toggle off and on the recording.
Press this button to start/pause the recording of the session. Note that only the main session will be recorded, recording is not available in breakout rooms. We are asking hosts to record their sessions and upload the video to their google folder. - Dark Blue Arrow: ‘Live Transcript’. This allows you to turn off/on different captioning options. You have the option to enable auto transcription which is free with Zoom.
- Purple Arrow: ‘Breakout Rooms’. This button allows you to create and manage breakout rooms.
You will be asked how many rooms you want to create, and to decide if participants should be assigned automatically, manually (by you), or to let participants choose room. Once you have made these choices, a new menu will pop up. By hovering over Rooms you can rename the room and assign people to them. You can move people between rooms once sorted by hovering over their name. Before opening the room, be sure to click on the wheel in the bottom left of the menu to adjust key settings, set the length of time for the rooms to be open, and set the countdown timer length. Additional support with breakout rooms available here, including a video of the process. - Pink Arrow: ‘Reactions’. This button allows you to choose ‘reactions’ that will appear on the video of you and next to your name in the participants menu. Reactions are a great way for getting feedback from participants, and can be used to help facilitate decision-making.
- Grey Arrow: ‘More’. Additional tools here.
This button allows you to go live on Facebook. You can ignore this.
Frequently asked Questions
The Zoom Admin from the Planning Team will let you in before the session and give host rights to you.
Unfortunately, ‘Polls’ are not available at this time. However, you can use external sites for a similar purpose by sharing links in the chat. Some examples include: Poll Everywhere, Mentimeter
Click on the ‘Participants’ button and this will give you a list of people on the call. Here you can see who is speaking or where the background noise is, by seeing who’s microphone icon does not have a slash. You can mute participants, turn off cameras, or remove participants if necessary.
Click on the ‘Share Screen’ button in your meeting and choose the screen that you would like to share. Be mindful of whether you are selecting your entire screen or a single tab or app. Also be mindful to select the ‘share sound’ if you intend to play video. Learn more about sharing your screen.


The first rule of Zoom Club: Don’t give up control of your screen.
You do not want random people in your public event taking control of the screen and sharing unwanted content with the group. You can restrict this — before the meeting and during the meeting in the host control bar — so that you’re the only one who can screen-share.
To prevent participants from screen sharing during a call, using the host controls at the bottom, click the arrow next to Share Screen and then Advanced Sharing Options.

Under “Who can share?” choose “Only Host” and close the window. You can also lock the Screen Share by default for all your meetings in your web settings.

Lock the meeting: It’s always smart to lock your front door, even when you’re inside the house. When you lock a Zoom Meeting that’s already started, no new participants can join, even if they have the meeting ID and password (if you have required one). In the meeting, click Participants at the bottom of your Zoom window. In the Participants pop-up, click the button that says Lock Meeting.
Remove unwanted or disruptive participants: From that Participants menu, you can mouse over a participant’s name, and several options will appear, including Remove. Click that to kick someone out of the meeting.
Put ‘em on hold: You can put everyone else on hold, and the attendees’ video and audio connections will be disabled momentarily. Click on someone’s video thumbnail and select Start Attendee On Hold to activate this feature. Click Take Off Hold in the Participants list when you’re ready to have them back.
Disable video: Hosts can turn someone’s video off. This will allow hosts to block unwanted, distracting, or inappropriate gestures on video or for that time your friend’s inside pocket is the star of the show.
Mute participants: Hosts can mute/unmute individual participants or all of them at once. Hosts can block unwanted, distracting, or inappropriate noise from other participants. You can also enable Mute Upon Entry in your settings to keep the clamor at bay in large meetings.